Search This Blog

Saturday, January 16, 2016

Cauliflower Thin Crust Pizza


Cauliflower Thin Crust Pizza


Ingredients 

For The Crust

1. Cauliflower  1 medium (this should produce 4 cups after shredding & steaming)
2. Raw Ricotta cheese 8 tbsp 
3. Egg 1 beaten
4. Salt 
5. Pepper
6. Italian Seasoning 
7. Garlic powder
8. Paramesan cheese powder 2 tbsp

Toppings

1. Pizza sauce 2-21/2 tbsp approx just to spread on the pizza 
2. Grated Mozzarella cheese 3/4 cup
3. Red chilli flakes for sprinkling
4. Jalapeño sliced 10-15
5. Chopped basil

Method Of Preparation

1. Preheat the oven to 400 F

2. Roughly chop the cauliflower florets & shred it in a food processor.


3. Put it in a large bowl & cover it with a cling wrap & microwave it for 10 minutes or till it turns tender.


4. To this, add the well beaten egg.


5. Add the ricotta cheese, salt, pepper, garlic powder & Italian seasoning.


6. Mix everything together.


7. Transfer this to a baking sheet lined with parchment paper & greased with non stick cooking spray.


8. Use your hands to make a round thin layer & keep the sides raised like a crust(like that in a pizza).


9. Bake in the middle rack of the oven for 35-40 minutes or till the crust is done.


10. Take the pizza out of the oven & top it with some pizza sauce & shredded mozzarella cheese, sliced jalapeños & red chilli flakes(optional).


11. Broil for just a few minutes until the cheese has melted & the edges have browned a bit.

12. Remove the pizza from the oven.


13. Put it on a cooling rack for it to retain firmness(optional).

14. Just before serving, sprinkle chopped basil leaves on top.


15. Slice & serve it with marinara sauce as a dip.


Notes: 

1. Do not add too many toppings on the pizza as it will make it soggy.

2. If you dont wanna use ricotta cheese for the crust, then u can replace it with 4 tbsp of paramesan cheese and  4 tbsp mozarella cheese.(however I havent tried it with mozarella & paramesan).

3. For a more healthier option, combine cauliflower with broccoli.

Tandoori Chicken


Tandoori Chicken


Recipe Type: Appetizer
Cuisine Type: Indian
Serves: 2

Ingredients

1. Chicken 2 whole legs/ 2 large boneless chicken breasts
2. Butter 1 tsp

Ingredients For First Marinade 

1. paprika 1/2 tsp 
2. red chilli powder 1/2 tsp
3. Juice of 1/2 lemon
4. Salt 

Ingredients For Second Marinade

1. Tandoori Masala 13/4 tbsp
2. Ginger garlic paste 1 tbsp
3. Hung Yogurt 2 tbsp
4. Sesame oil 11/8 tbsp
5. Corn starch 1/2 tsp

Ingredients For Basting 

1. Sesame oil 2 tsp or more if needed
2. Tandoori masala  or paprika 1 or 2 pinches

Ingredients For Tandoori Masala

1. Cumin seeds 2 tsp
2. Coriander seeds 2 tsp
3. Cinnamon 2" stick
4. Black cardamom 2
5. Green cardamom 2
6. Bay leaf 1 small leaf
7. Cloves 2
8. Kasuri methi 1 tsp
9. Peppercorns 1 tbsp
10. Dry red chillies 3
11. Paprika 1 tsp

Method Of Preparation Of Tandoori Masala

1. Heat a skillet & dry roast all the above mentioned ingredients. Let it cool.

2. Once cooled, grind it to a fine powder.

Notes:

If u cannot or have no time to do the above step, then just add 1 tsp garam masala, 1 tsp red chilli powder, 1 tsp paprika, 1 tsp pepper powder, 1 tsp kasuri methi & 1 tsp each of roasted cumin powder & roasted coriander powder to the marinade mixture.

Method Of Preparation Of Basting Mixture 

1. In a small bowl, add a tsp of oil & add a pinch of tandoori masala or paprika. Mix it well & keep it aside. 

2. This is the mixture ur going to use for basting the chicken before putting it in the oven & while it is in the oven.

Method Of Preparation Of Chicken

1. Wash the chicken well & pat dry 

2. Using a sharp knife make three gashes on the chicken. Also with a fork, just poke the chicken here & there.

3. Put the chicken inside a bowl & add the ingredients mentioned under the first marinade.

4. Rub the chicken with the marinade nicely for about 2 minutes, rub a little it in the gashes/incisions that you made on the chicken.

5. Cover it & Allow it to rest for 15 minutes so that the juices & the spices seep into the chicken.

6. After 15 minutes, add the rest of the ingredients mentioned under the second marination to the already marinated chicken.

7. Mix together nicely so that all the spices get coated nicely on the chicken.

8. Cover it & leave it in the refrigerator overnight or atleast for a minimum of 5 hours.

9. Take it out of the fridge 30 minutes before u put it in the oven.

10. In the meantime prepare the basting mixture.

11. Preheat the oven at 550 F for 15 minutes.

12. Line a baking tray with aluminum foil & grease with non stick cooking spray.

13. Place the marinated chicken on the greased pan, using a pastry brush, baste it with the basting mixture & then put it in the oven at 500 C for 25-30 minutes or till done. Do not overcook the chicken as they may become dry & charred.

14. Bake the chicken for the first 15 minutes, then baste the chicken again & now turn the chicken to the other side. Baste it & put it back in the oven for another 5 minutes.

15. Again baste it, flip it to the other side & again bake it for another 5-10 minutes or till done depending on the oven & how tender ur chicken is.

16. To get the smokey or charred flavor, put the chicken on the top rack & broil it for a minute or two on each side.

17. Turn off the oven. 

18.  Let the chicken sit for a couple of minutes before u serve it so that the chicken becomes nice & juicy inside.

19.  Baste the chicken with some butter before serving.

20.  Serve the tandoori chicken with lemon wedges, onion rings & mint & coriander chutney.

Notes: 

1. The baking time varies from oven to oven, so u really need to keep an eye on the chicken all the time.

2. It may take anywhere between 20-30 minutes for the chicken to cook fully.

3. When u put it on broil, u really need to be right there in front of the oven as a little extra time in the oven can burn the chicken. So take it out at the right time.

4. Do not overcook the chicken as it will turn dry.

5. You need to flip & cook the chicken 2-3 times atleast so that both the sides get cooked well.


Friday, January 15, 2016

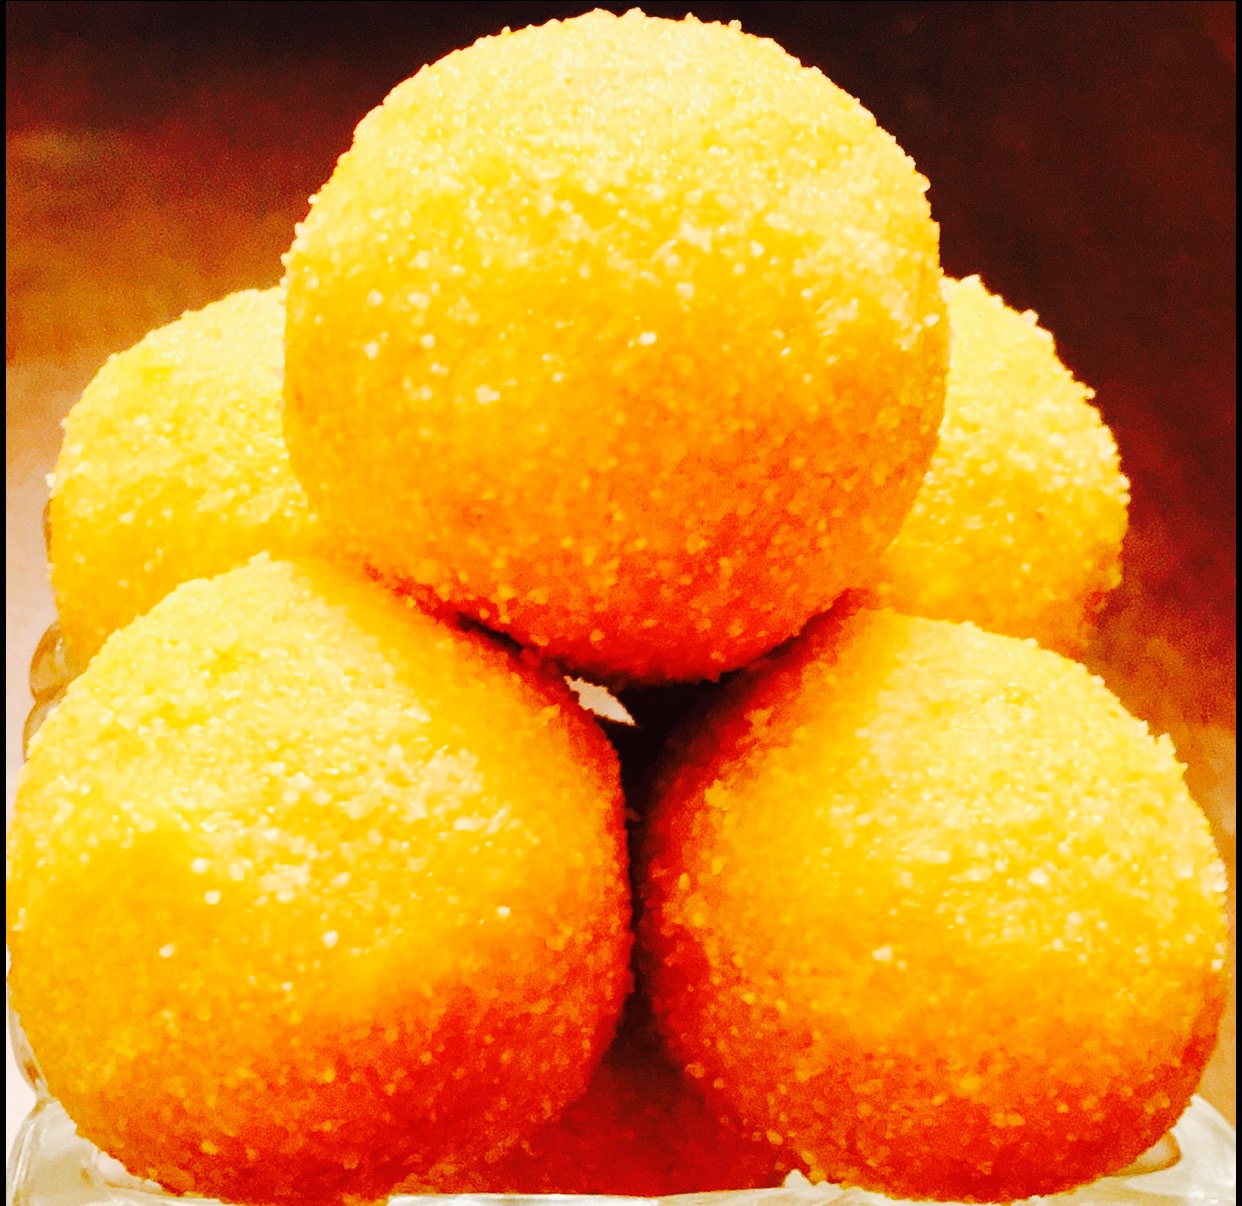
Easy Microwave Sooji Besan Ladoo


Easy Microwave Sooji Besan Ladoo


Recipe Type: Sweets
Yields: 12-15

Ingredients: 

1. Besan 1 cup
2. Sooji/rava 1 cup
3. powdered sugar 1 cup
4. coconut shredded 41/2 tbsp
5. ghee 41/2 tbsp 
6. Cardamom powder 1/2 tsp
7. Fried cashew halves 8-10(optional)

Method Of Preparation:

1. Into a large microwave safe bowl, sift besan.

2. Add rava to it.

3. Mix well & add 3 tbsp ghee to it.

4. Microwave on high for 51/2 minutes, taking it out of the oven every 2 minutes & give it a stir.

5. When you take it out of the oven, there ll be an awesome aroma of the nutty flavor of besan, that is when you know it is done. If u don't get that aroma, then you may keep it for an additional 30 seconds or 1 minute but make sure to add a few drops of ghee otherwise the mixture will get burnt. 

6. Now add the shredded coconut, 11/2 tbsp ghee & mix it & again microwave it for another 2-21/2 minutes. Now there's a high chance of it getting burnt, so keep an eye, take it out & give it a stir every one minute & pop it back it into the oven. If u think u need to add some more ghee, then add another 1/4 tsp more when u take it out of the oven to stir it as you dont want to burn the mixture because of les ghee in it.

7. Take it out, stir it n leave it to cool.

8. When the mixture becomes cold (it might take around 12 minutes), add the powdered sugar & cardamom powder to it n mix well & then make balls out of it.

9. You can decorate the balls by keeping a cashew on the top of every ladoo.

10. Store these ladoos in an air tight container.

Notes:

1. There shouldn't be too much ghee as it ll make it difficult to make balls out of the mixture.

2. At the same time there shouldn't be too little too as the mixture might end up getting burnt.

3. The mixture definitely needs to cool down before u add sugar to it. Do not add sugar to the hot mixture.

4. Do not add castor sugar to the mixture, add only readymade powdered sugar or powder the sugar in your blender.


Thursday, January 14, 2016

Hasselback Potatoes


Hasselback Potatoes


Ingredients for Potatoes

1. Oblong potatoes of uniform size 2 ( I used Russet potatoes)
2. Unsalted butter 6 tbsp approx
3. Garlic cloves 6 finely chopped
4. Any herbs of ur choice (basil, parsley, oregano or rosemary) or Italian seasoning 1 tbsp or more (I used Italian seasoning)
5. Olive oil 
6. Salt 
7. Pepper

Method Of Preparation

1. Preheat your oven to 425 F. Line ur baking sheet with an aluminum foil greased with non stick cooking spray. Set this aside.

2. Rinse & scrub the potatoes well. Scrape off the skin here & there (optional). Do not try to remove all the skin.

3. Pat dry the potatoes & place it on a cutting board. If ur potatoes are shapeless & don't  lie flat on the board & keeps rolling & if it's difficult to work on, then cut a thin slice(1/4 inch) from the middle bottom just to make it lie flat. Skip this step if your potatoes are good to work on.

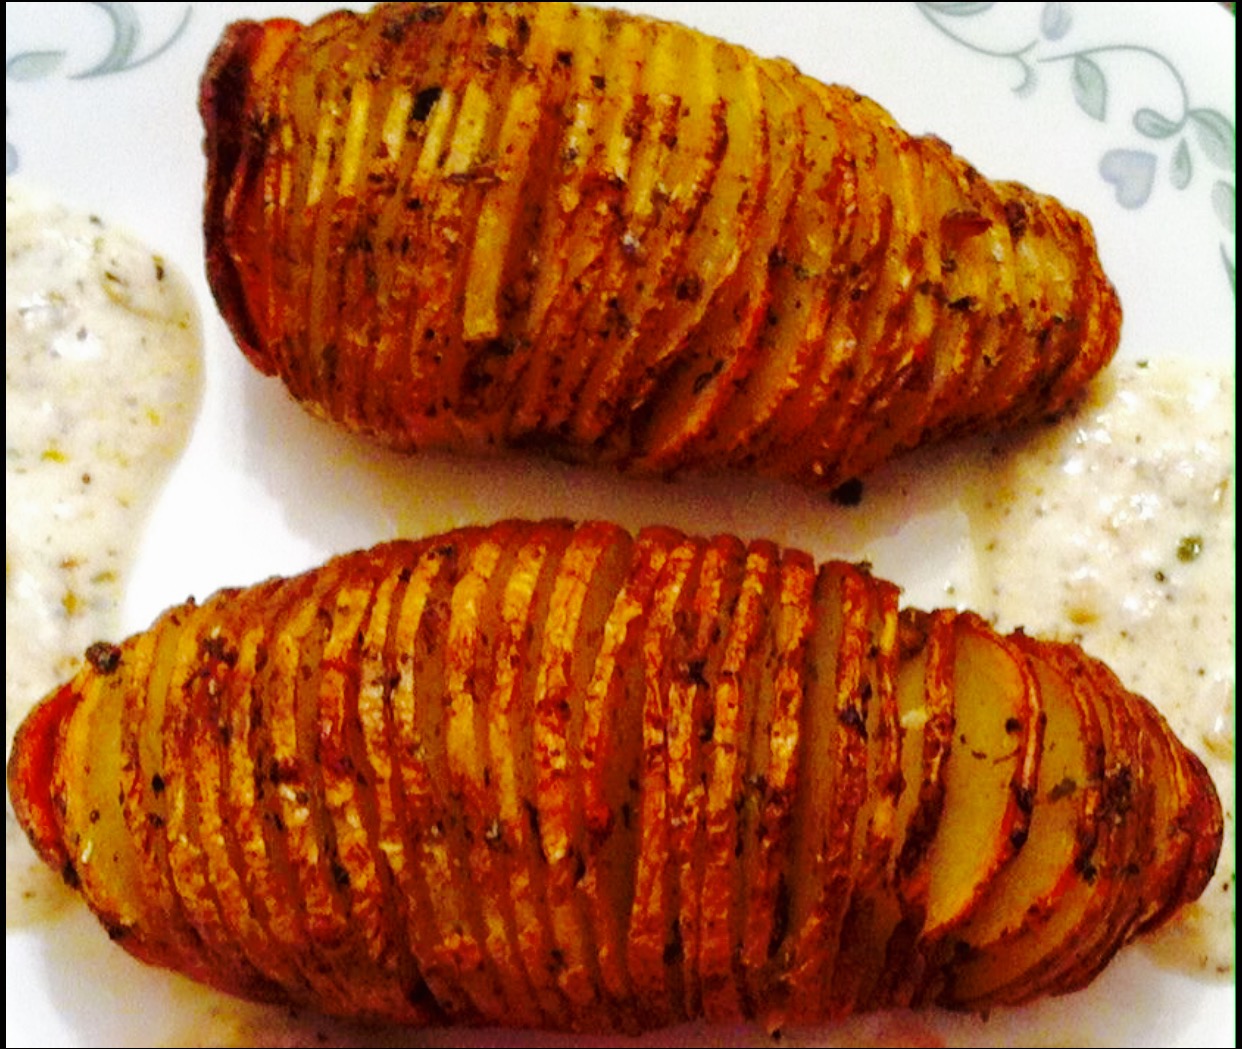
4. Using a sharp knife, slice each potato vertically(like the way it's shown in the picture above), leaving 1/4 inch space between each slices.

5. If you are unable to make thin slices then you may make it a little thick but remember thin slices give u crispy potatoes.

6. The base of the potato needs to remain intact so make the slits only till 3/4 inch of the potato. Leave 1/4 of an inch at the bottom of the potato intact. Make sure not to run ur knife all the way through the potato. Also make sure not to cut only a little(less than 3/4 inch)because the potatoes will not fan out(like the way it's in the picture)then.

7. Apply a generous amount of olive oil on the potatoes. You need to coat the potatoes well with oil, only then the potatoes will turn out crispy.

8. After coating the potatoes with oil, bake them in a preheated oven at 425 F for 20 minutes.

9. In the meantime, in a skillet add butter, finely chopped garlic, salt & Italian seasoning. Turn on the flame to low (only after adding everything) & let the butter absorb all the flavors of the Italian herbs & garlic into it. Leave it on low flame for 5-10 minutes. Turn off the gas.

10. After 20 minutes, take the potatoes out of the oven & with a pastry brush, brush the inside & outside of the slits of the potatoes with the garlic infused butter. Add only the butter & not the chopped garlic & herbs in it.

11. The potatoes must have fanned out a little by now (I.e, after the first 20 minutes of baking), now with a very small spoon try to fan out each & every slit (i.e, spread out the slits if they are sticking to each other). Make sure you do not press too much & break them. The garlic butter should go deep into the slits of the potatoes. 

12. Put it back in the oven & take it out after 15 minutes. Again repeat the same process of brushing the potatoes with the butter (only the butter & not the garlic & herbs in it). Make sure the butter seeps into the potatoes.

13. Then again put it back in the oven for another 15 minutes. Take it out & again repeat the above process of brushing the butter. Once u brush the slits nicely with butter this last time,(yes this is the last time u will be popping the potatoes into the oven) remember to sprinkle the chopped garlic & herbs that is left over in the butter inside & outside the slits of the potatoes.This is the only time u need to add the garlic & herbs, the other two times it should just be butter & no garlic & herbs. You  can also sprinkle powdered Parmesan cheese on top of the potatoes but this is purely optional. However I did not do it. Now it's time to put it in the oven for a final baking of 10 minutes.

14. Take it out after 10 minutes & it's all done.

15. This needs a total baking time of an hour.{20 minutes of baking with just the olive oil coating & 40 minutes with the butter(15+15+10)}

16. Make enough garlic & herbs infused butter as you need to brush them thrice with butter. The more butter you use on the potatoes, the more tasty they will turn out to be. Also add garlic in generous amount in the butter as it will make ur potatoes nice & flavorful.

Notes:

1. Use big long potatoes for this, only then this will be nice & beautiful to present & to look at. It is also easy to make slits if the potatoes are oblong.

2. Make sure to fan out the slits sticking to each other each time u take the potatoes out of the oven. The slits shouldn't be sticking to each other. If the slits aren't sticking to each other, then u don't have to take the trouble of fanning it out.

3. Only if u fan out the potatoes (i.e, spread the slits), the butter can be brushed on the slits properly & it will seep in. If the slits are sticking to each other, the butter cannot seep into each slit & therefore ur potatoes will not turn out good. The garlic butter is the one that makes it very flavorful so it needs to seep deep into the potatoes.

4. Make sure only to use a very small spoon to fan out the slits otherwise the potatoes will break as the potatoes soften after each bake.

5. Use a pastry brush to baste the slits, only with the brush can u baste the inside & outside of the slits properly.

6. If the above mentioned quantity of butter isn't enough, then u can make more. If it's too much, then use the rest for the yogurt dip :-) 

Ingredients For Yogurt Dip

1. Hung yogurt 1/2 cup
2. Italian herbs or Italian seasoning 1 tbsp
3. Salt
4. Pepper
5. Garlic 3 cloves chopped finely 
6. Butter 2 tbsp 

Method Of Preparation 

1. Make the garlic infused butter (see step #9).
2. Take hung yogurt in a bowl.
3. Mix in the garlic butter with the yogurt & blend well.
4. Dip the potatoes in this or u can just spread this dip on top of the potatoes & relish it (see picture below).
5. Cut tomatoes, onions & cucumbers & add this dip to the veggies & relish it.


Chicken Pakoras


Chicken Pakoras


Ingredients

1 a. Boneless chicken 1lb
   b. turmeric powder 1/2 tsp
   c. chilly powder 2tsp
   d. fennel seeds 1/2 tsp
   e. cumin seeds 1/2 tsp
   f. curry leaves chopped
   g. green chillies 2 finely chopped
   h. ginger garlic paste 21/2 tsp
   i.salt

Ingredients for the batter

2. a. Besan 1/2 cup
    b. rice flour/corn starch 3 tbsp
    c. Paprika 1tsp
    d. Salt
    e. Water 6 tbsps approx

3. Oil for deep frying the pakoras

Method Of Preparation

1. Wash the chicken well & pat it dry.

2. Cut it into 1" or 2" pieces

3. Marinate the chicken pieces with all the ingrients mentioned under "1". Set it aside on the countertop for an hour. Let the ingredients marinate well with the chicken.

4. Now mix all the ingredients mentioned under "2". After an hour of marination add the marinated chicken to this("2"). Do not add water at this point.

5. Mix everything together nicely & then add water 1tbsp at a time. You may or may not need 6tbsps of water, so just add water slowly. You need water just to make the mixture moist & to be able to hold everything together.So, please do not add all the water in one go.

6. Heat oil on medium heat.

7. Make small dumplings out of the mixture & gently drop them in the oil & fry until well cooked from inside & crispy on the outside. The pakoras need to becomne golden brown in color.

8. Serve hot with onion rings, lemon wedges & green chutney

Notes

1. Do not overcrowd the pakoras in the pan of oil

2. Do not fry them on high heat as they tend to become brown fast & remain uncooked inside.

3 Also do not fry them on low flame as the pakoras tend to disintegrate in the oil.


Wednesday, January 13, 2016

Stuffed & Baked Cheesy Chicken Nuggets


Stuffed & Baked Cheesy Chicken Nuggets


Ingredients for Chicken Nuggets

1. Chicken breast   1 lb cut into 2" pieces
2. Mozzarella cheese strings   2 cut into small cubes
3. Non stick baking/cooking oil spray
4. Panko bread crumbs 1 cup
5. Powdered mozzarella cheese 5 tbsp
6. Garlic powder 1/2 tsp
7. Dried parsley & oregano 1/4 tsp 
8. Salt 
9. Pepper
10. Eggs 2 large beaten well
11. All purpose flour 5 tbsp

Ingredients for the Yogurt Dip

1. Yogurt  1/3 cup
2. Salt
3. Pepper
4. Juice of half a lemon
5. Honey Mustard Sauce 3 tbsp 
6. Garlic cloves minced/crushed 4
7. Parsley 3 tsp 
8. Coriander leaves(optional) 11/2 tsp

Method Of Preparation (Method 1)

1. Preheat ur oven to 400 degree Celsius.

2. Place parchment paper on a baking sheet.

3. Spread the panko breadcrumbs in a thin layer on the baking sheet & bake for 3-4 minutes or until lightly toasted. Do not let it burn. Keep an eye on the oven.

4. In the meantime wash the chicken nicely & pat it dry & cut it into 2" pieces. Coat the chicken well with salt & pepper. Make a vertical slit/cut(make a pocket)on one side of the chicken with a knife. The pocket needs to be big enough to insert the cheese cube. The cut should only be on one side so that the cheese remains inside the chicken & doesn't come out through the other side. Do this for all the pieces & keep it aside.

5. Once the crumbs are cooled, transfer it to a shallow bowl & add garlic powder, Parmesan cheese powder, dried parsley & olive oil & mix well. Keep it aside.

6. Place a wire rack on the baking sheet & coat the rack with non stick baking spray or place an aluminum foil on the baking sheet & coat it with non stick spray.

7. Take a big bowl & add flour to it. In another big bowl add well beaten eggs.  Make sure the bowl is big enough & there's enough space, only then u can put all the chicken pieces into it & coat them evenly.

8. If u don't have a big bowl, then divide the chicken pieces & flour & egg mixture into two batches. Put the first batch into the bowl with flour & coat it well in such a way that the flour gets evenly coated on the chicken & shake off all the excess flour from the chicken. There shouldn't be too much flour sticking on the chicken so make sure u shake off the excess flour. It is very important to pat dry the chicken before seasoning it with salt & pepper, if there's water on it, then the flour is going to stick to the chicken & will spoil the taste of the nuggets when baked.

9. Then drop these chicken into the egg mixture & coat them well. Shake off the excess egg drip.

10. Take one by one out of the egg mixture & coat the chicken one by one on the bread crumbs. Press them on the breadcrumbs so that it sticks well to the chicken & forms a nice coating.

11. Repeat the same procedure for the second batch of chicken(only if u have used a small bowl)(see #8)

12. Spray oil on the chicken.

13. Transfer them to the baking rack & bake for 15 minutes or until done(i.e, until they are no longer pink inside & they turn golden brown outside) at 425 degree F

14. When it is about 10 minutes, make sure to turn the sides.

15. Bake for another 5 more minutes or till done.

16. If you missed the 3rd step(i.e, if u did not bake the panko crumbs for 3-4 minutes)(see above), then u may do this step mentioned below.

When its 13 minutes into baking, put the nuggets on the top rack & broil 
for 2 minutes till the crust turns golden brown. Keep an eye on the oven 
when u broil it. U don't want to have burnt nuggets. Skip this if u have missed the 3rd step.

17. Serve with yogurt dip or barbecue sauce or ranch.

Notes: 

1. Alternatively u can add flour in a big ziploc bag & add the chicken into it, close the bag & shake it well so that the flour gets coated on the chicken.

2. If u think that u cannot make a pocket with the knife & insert the cheese cube, then u may mince the chicken & then take a small lemon size chicken mince, wet your palm & flatten it on ur palm, place the cheese cube in the middle of the mixture & close it & shape it into a nugget.

3. The cheese cube should be small enough to fit into the pocket of chicken.

4. The chicken needs to be cut into thick pieces only then u will be able to make pockets & place the chicken in it. It is not possible to insert the cheese if u cut the chicken into thin pieces. So, buy the thick breast fillets & not the thin one.

5. Do not overbake the nuggets as they may turn out to become dry.

6. If you want ur nuggets to be really juicy & moist inside, then u need to marinate these chicken pieces in salted butter milk & hot sauce(optional) for a day or atleast overnight.

7. If u want fried nuggets, then u can deep fry them in a skillet.

If you don't want to coat the chicken with eggs & flour, there are alternative coating methods, I shall post that below. When you try out the first time, u may try all the different methods of coating & from the second time onwards u can do it the way u liked the most.


Method 2: 

Take a bowl & add 1 tbsp olive oil in it. Add the seasoned(salt & pepper) chicken pieces into it & coat them well in oil& then coat & press them on the panko bread crumbs. In this case, u need not mix the breadcrumbs with olive oil. Just mix it with garlic powder, dried parsley & Parmesan cheese powder & then follow the rest of the steps from step #12

Method 3: 

You can mince the chicken & wet ur Palm & place the minced meat on ur Palm & shape them into nuggets & coat these somewhat wet nuggets on the crumbs & press them so that the crumbs get nicely coated on the chicken. Then follow the same from step #12

Method 4: 

U can simply skip the flour & coat the chicken pieces only in egg mixture & then coat them directly with bread crumbs. U can replace eggs with 1/3 cup milk here if u wish to. Then follow the rest of the steps from #12

Method Of Preparation of Dip

Combine together yogurt, lemon, honey mustard sauce, parsley, coriander leaves  & season it with salt & pepper. 

Notes

You can replace yogurt with mayo & sour cream(21/2 tbsp each)


Kerala Fish Curry


Kerala Fish Curry


Recipe type: Main 
Cuisine: Indian(Kerala)
Serves" 4

Ingredients

1. Salmon 1 lb
2. Small onions 10
3. Tomatoes 1
4. Ginger Garlic Paste 1 tbsp
5. Green chillies 3 slit
6. Turmeric powder 1/2 tsp
7. Red chilli powder 11/2 tsp
8. Coriander powder 2 tsp
9. Fenugreek seeds 1/2 tsp + 1/4 tsp
10. Curry leaves 1 + 1 sprigs
11. Gamboge/kudam puli/kokum 2 or 3
12. Coconut 5 or 6 tbsp 
13. Coconut Oil 2tsp + 1 tbsp
14. Salt
15. Water

Method Of Preparation

1. Clean, wash & cut the fish into pieces.
2. Soak kudam puli/kokum in hot water & keep it aside.
3. Heat a kadai & add 2 tsps of oil.
4. Once the oil is hot, add 1/2 tsp fenugreek seeds. Keep the flame low so that the seeds don't get burnt.
5. Then add the grated coconut... When the coconut becomes golden brown add the chilli powder & coriander powder. Roast them well for a minute but make sure it doesn't get burnt. 
6. Turn off the gas. Let the mixture cool.
7. Once cooled, add water & grind to a fine paste.
8. In the same kadai add 1 tbsp coconut oil.
9. When the oil gets hot, add 1/4 tsp fenugreek seeds.
10. When the seeds become golden brown add the curry leaves followed by onions.
11. Sauté the onions till it becomes translucent.
12. Now add the green chillies, sauté for a few seconds, then add the ginger garlic paste.
13. Sauté till the raw smell goes away.
14. Now add the tomatoes & salt. Cook till the tomatoes get mashed & cooked well.
15. Then add the turmeric powder & sauté well.
16. Now discard the water(in which the kokum was soaked)& add the kokum & stir gently.
17. Add the ground paste along with water. The curry shouldn't be too thick or too watery. It definitely needs to be of pouring consistency.
18. Once this mixture starts boiling, add the fish & cover & cook for 6-10minutes or till the fish becomes tender & you see oil floating on the top.
19. After a minute, open the lid, add the remaining curry leaves & again close the lid & continue to cook the fish.
20. Once u add the fish, do not stir it with the ladle, just swirl the pan once or twice & then let the fish cook on low flame.
21. Once done, turn off the flame but don't open the lid for atleast twenty minutes.
22. This tastes best the next day when the fish remain soaked in the curry & absorbs all the flavors & aroma.

Notes: 

Traditionally this fish curry should be prepared in a mannchatti/earthenware to get the authentic taste & aroma.
If you do not have kodampuli u can substitute it with the regular tamarind(add lemon size tamarind)
If you do not have small onions substitute it with 1 medium sized big onion.